Make It Yours
Part 1: Set Up Sync
Your files are local. If you lose access to your computer, you’ll lose access to your files. Set up sync to a). back up your files and b). access them from your phone / other devices.
If you’re pushing to GitHub (see Time Travel module), your files are backed up. I use GitHub in addition to Obsidian Sync - Git for backup/version control, Sync for phone access.
Option A: Obsidian Sync ($5/month) - Recommended
- Make sure your workspace folder is in a local folder (like Documents), NOT in iCloud, Dropbox, or OneDrive - mixing sync services causes conflicts
- In Obsidian, go to Settings → Core plugins → Turn on “Sync”
- Go to Settings → Sync → Log in (create an Obsidian account if needed)
- Click “Create new vault” and give it a name
- Choose what to sync (defaults are fine to start)
Your files now sync to Obsidian’s servers and with other device where you log in.
Option B: iCloud (Free, Apple devices only)
- Move your claude-workspace folder into iCloud Drive
- In Obsidian, open the vault from its new iCloud location
- On iPhone/iPad, download the Obsidian app - it will see your iCloud vaults automatically
Note: iCloud sync can occasionally have conflicts if you’re editing on multiple devices at once. If you run into issues, Obsidian Sync handles this more gracefully.
Option C: OneDrive/Google Drive
Same idea as iCloud - move your workspace folder into the cloud drive folder, then open it from there in Obsidian.
Mobile Access
Once sync is set up, install Obsidian on your phone:
If using Obsidian Sync:
- Open Obsidian on your phone
- Tap “Log in” and use the same account as desktop
- Your vault will appear - tap to open it
- Changes sync automatically between devices
If using iCloud (Apple devices):
- Open Obsidian on your iPhone/iPad
- Your iCloud vaults appear automatically
- Tap your workspace to open it
Having trouble with iCloud?
1. Check iCloud settings on iPhone
- Settings → iCloud → Saved to iCloud (See All) → iCloud Drive must be ON
- In the same menu, scroll to find Obsidian and make sure it’s toggled on
2. Keep files downloaded (iPhone)
- Open Files app → iCloud Drive → Obsidian
- Long-press the vault folder → “Download Now” (wait for cloud icons to disappear)
- Long-press again → “Keep Downloaded”
- Close Obsidian completely and restart your phone
3. Keep files downloaded (Mac)
- In Finder, right-click the vault folder → “Download Now”
- Right-click again → “Keep Downloaded”
4. Still not working? Create vault on iPhone first Sometimes it’s easier to create the vault from iPhone and let Mac sync to it:
- Back up your vault contents somewhere safe
- Delete the Obsidian folder from iCloud Drive
- Create a fresh vault on iPhone with “Store in iCloud” checked
- Open that vault on Mac
- Move the backed-up files into it
If using OneDrive/Google Drive: You’ll need a third-party app like Autosync or FolderSync to keep files in sync with Obsidian’s local storage on Android. On iOS, this is trickier - Obsidian Sync is the cleanest option.
Alternative: Any Text Editor
Your workspace is just a folder of files - any text editor can open it. If you’re more comfortable with VS Code, Cursor, or Sublime, use that. Obsidian is nice for the mobile app, sync, and clean interface, but it’s not required.
Part 2: Migration Strategy
What to move?
Keep using existing tools when:
- Utilities (Stripe, Shopify, Vercel, support tools, etc.)
- It needs specialized UI (Figma, CAD, video editing)
- Tools enmeshed in your teams workflows, and borderline impossible to convince your team
Migrate to text files when:
- It’s personal information/notes
- It’s reference material
- You’re the primary user
- You want AI to help with it
When we say “local”, this doesn’t mean solo. With Obsidian Sync or GitHub, you can collaborate with others on the same files.
Local vs Cloud
Here’s an example of how you could split it:
Keep in cloud storage:
- Shared team documents (Google Docs your team edits together)
- Files that need real-time collaboration
Move to local workspace:
- Personal notes, tasks, and planning docs
- Reference materials you want Claude to access
- Templates and drafts you’re working on solo
Obsidian Sync lets you add team members to work on the same vault together. Alternatively, some teams use a shared Git repository as their collaborative workspace.
Where to Start
Notes app — Once your notes are local, Claude can search across everything, surface connections you forgot about, and help you think through problems using your own past work. Most note apps export to markdown, making this seamless.
To-do list — Claude can scan your tasks alongside your calendar, notes, and projects to help suggest what matters today.
Part 3: Export Your Data
Notion
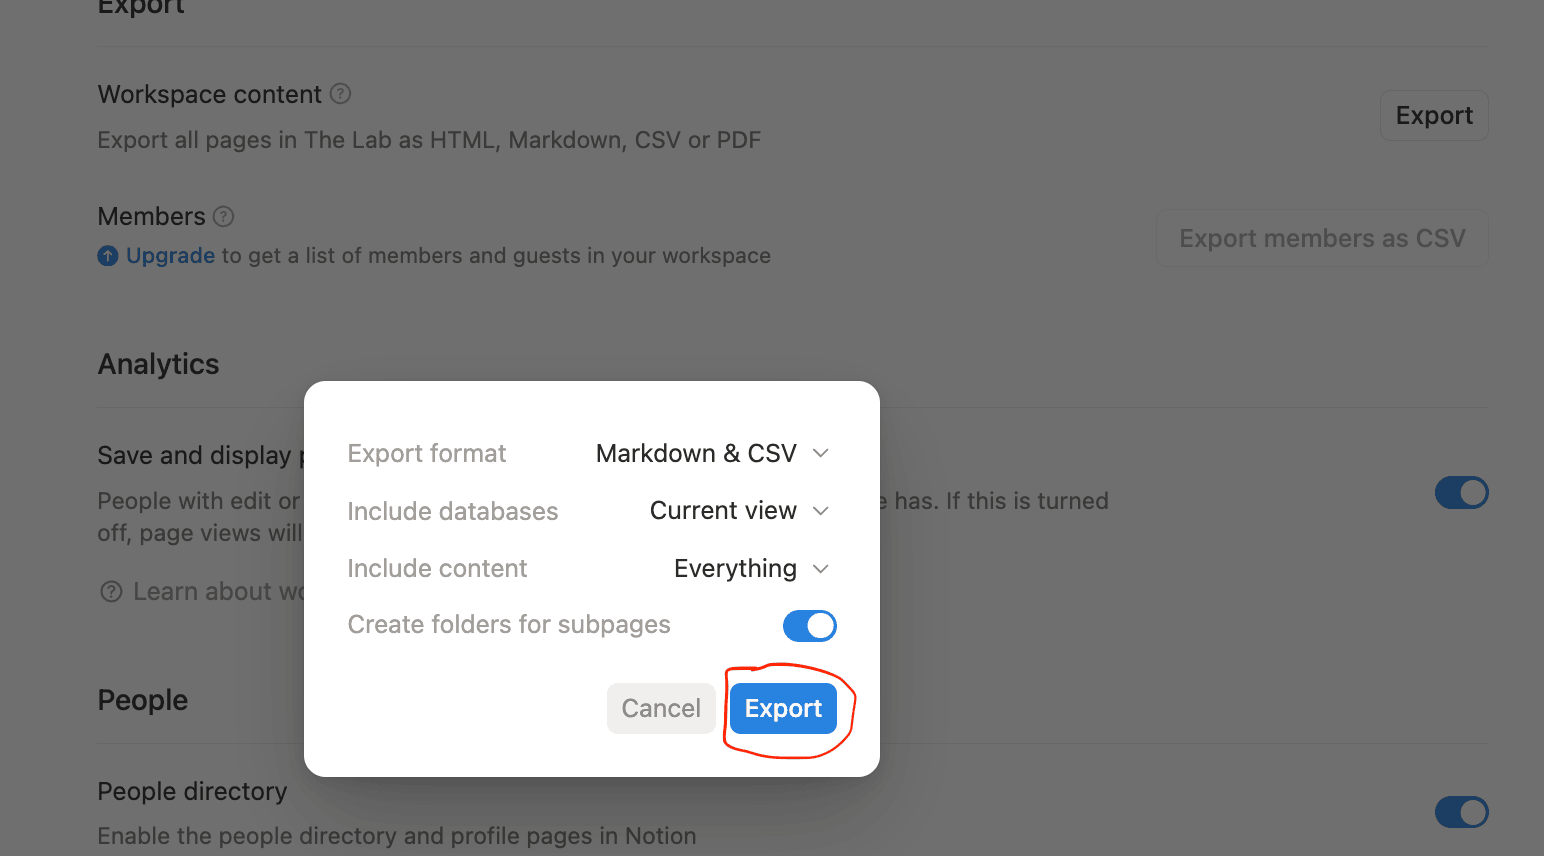
- Settings → General → Export
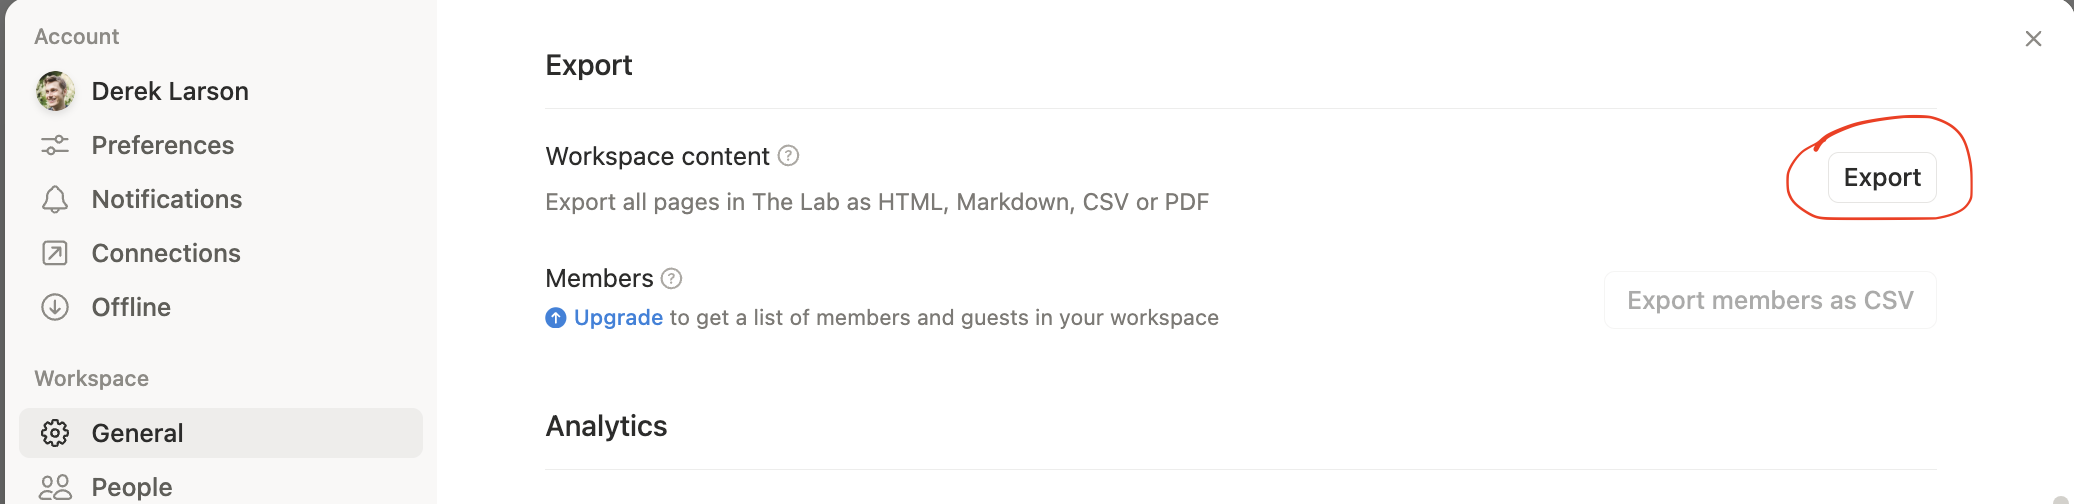
- Choose Markdown & CSV format, include subpages and create folders
-
Check your Downloads folder - you’ll see a zip file like
Export-abc123.zip. Unzip it (on Mac, double-click the zip; on Windows, right-click → Extract All) and you’ll find a folder structure matching your Notion pages, with.mdfiles for each page and any embedded files alongside them. -
Move the unzipped folder into your claude-workspace (drag it into
notes/or create a new folder likenotion-import/) -
Ask Claude to help organize: “Look at the files in notion-import/ and help me reorganize them into my existing folder structure”
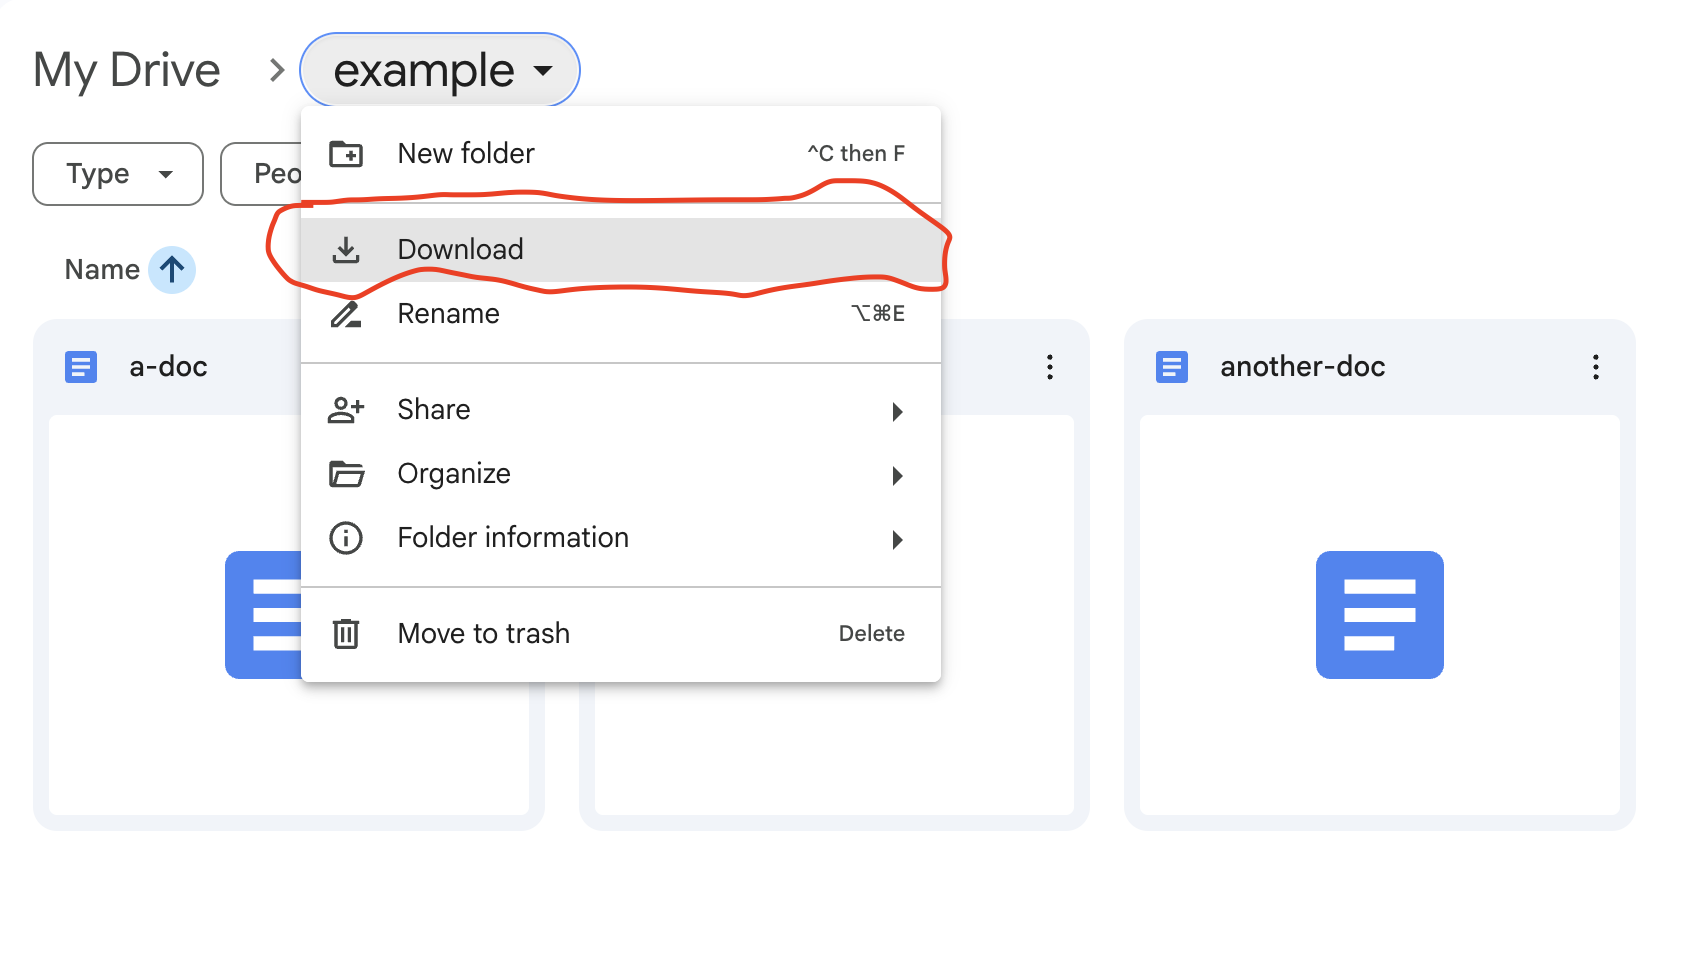
Google Drive
- Select a folder, click the dropdown, and Download
-
Check your Downloads folder - you’ll see a zip file with the folder name. Unzip it (on Mac, double-click the zip; on Windows, right-click → Extract All) and you’ll find your files in their original format (Google Docs become
.docx, Sheets become.xlsx, etc.) -
Move the unzipped folder into your claude-workspace
-
Ask Claude to help convert: “Convert the .docx files in google-import/ to markdown and organize them into my notes folder”
You don’t have to migrate everything. Use /drive to browse and pull files as you need them. See Your Systems.
Other tools
- Most have export to CSV/JSON/Markdown
- Focus on getting the data out first (even if requires copy and pasting)
- Don’t overthink the format.
Part 4: Organization Principles
Recommended Structure
Start simple - Claude is great at finding files:
File Naming
- Descriptive names, no spaces:
product-roadmap.mdnotProduct Roadmap v2 FINAL.md - Dates for time-sensitive:
meeting-sarah-2024-11-18-.md - Let Claude rename files in bulk - just dump everything in, and ask for the change you want
Evolution Strategy
Your system will evolve. That’s fine:
- Start messy, organize later
- Ask Claude: “How should I reorganize these files?”
Part 5: Working with Claude
How Claude Sees Your Files
Claude can access any file in your workspace. Two ways:
1. Direct reference with @ Type @ and start typing a filename to load it into context:
2. Let Claude search Just describe what you need:
This is different from slash commands - you’re having a conversation with Claude, not running pre-built commands. Claude can search, read, edit, and create files based on natural language.
Approval Mode vs YOLO Mode
By default, Claude asks permission before:
- Creating files
- Editing files
- Running commands
Think of Approval Mode as your safety net. It gives you a chance to say “Wait, don’t delete that!” before it happens. In early days, stay in Approval Mode until you are comfortable reverting file changes.
To skip approvals (YOLO mode): Press Shift-Tab to toggle. You’ll see “Auto-approval: ON”
Use YOLO when:
- You’re working fast with your own files
- Everything is backed up with Git or Obsidian Sync
- You feel comfortable reverting changes (e.g. hit escape twice, and then “restore code and conversation”)
Stay in approval mode when:
- Using external tools (see External Tools module)
- You want more control over the changes
- Learning what Claude will do
Remember: If Claude makes unwanted changes, press ESC ESC to cancel and revert.
Model Selection
Use /model to switch between:
- Opus - Smartest, slower, lower limits (I use this for most things)
- Sonnet - Balance of speed and intelligence, has higher limits
- Haiku - Fastest, least smart (I almost never use this)
Toggle how much time the model spends “thinking” with Tab.
Part 6: Custom Commands
Understanding Commands
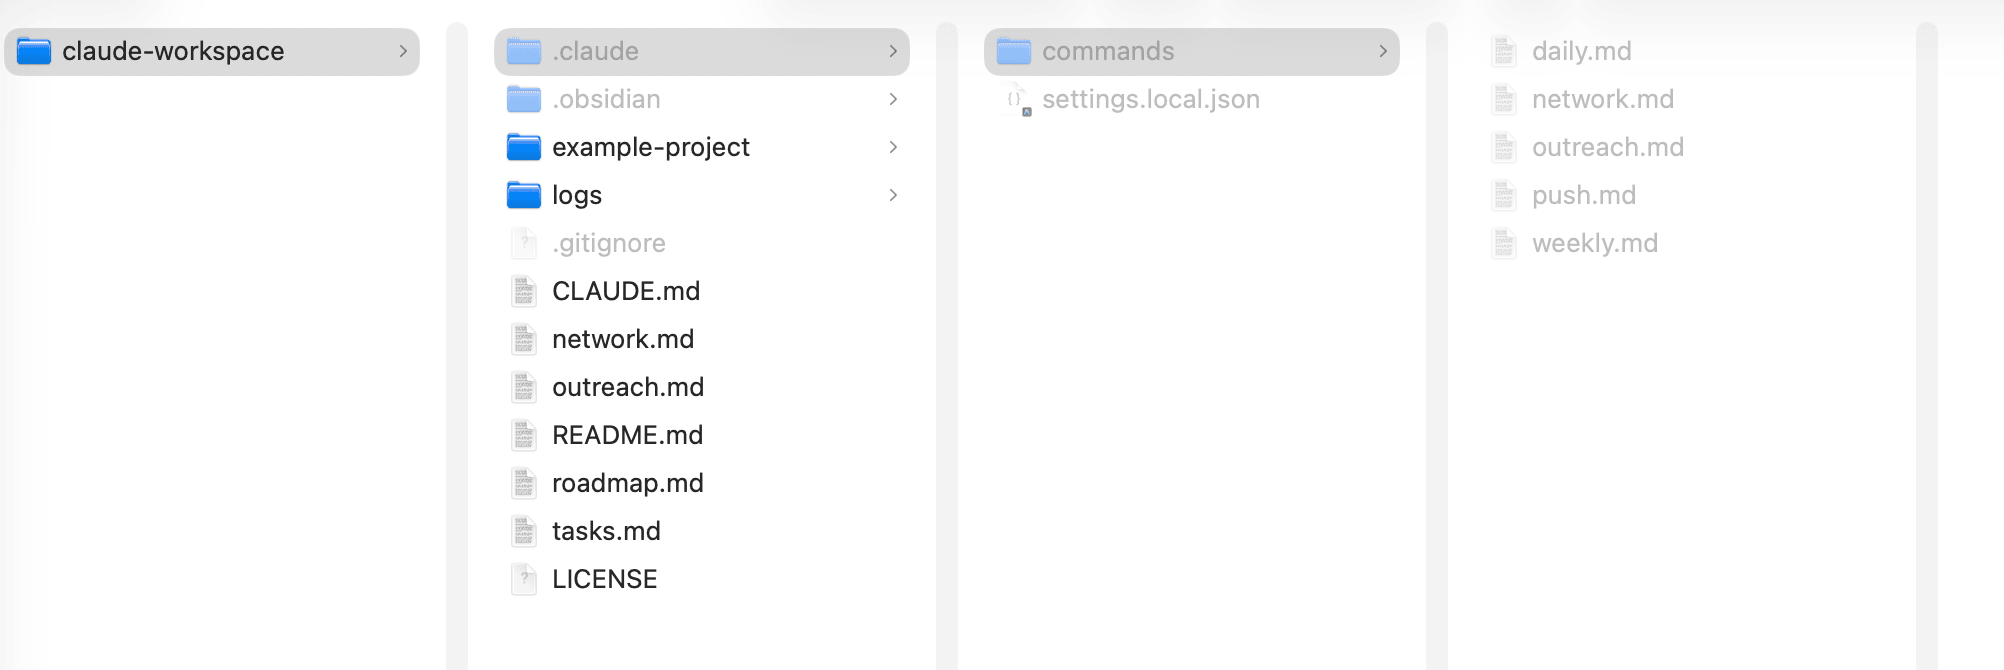
Commands live in .claude/commands/
They are markdown files with text based instructions.
Pre-Built Commands in Your Starter Kit
These commands are already loaded in .claude/commands/:
/morning - Morning brief. Scans your files, surfaces what matters today.
/weekly - Weekly review. What got done, what didn’t, what’s next.
/voice-router - Process voice notes into tasks, ideas, file edits.
/push - Commit and push changes to GitHub.
Customizing Commands
Option 1: Just tell Claude to update them “Update /morning command to search the web for the weather in NYC” “Change /weekly command to focus more on metrics”
Option 2: Edit the files yourself
In Obsidian, expand the .claude/commands/ folder in the left sidebar. Click any command file to open it - you can edit it like any document.
For example, if /morning focuses too much on tasks, open morning.md and add “Always include my top 3 calendar events.”
Next time you run the command, the updated instructions will be given to claude.
Create Your Own Command
Tell Claude what you want:
Claude will create .claude/commands/tasks.md
You can then navigate to that folder, and edit it as needed.
In the External Tools module we’ll integrate cloud based services (e.g. Slack, Gmail, etc.)
This opens a lot of potential.
Part 7: CLAUDE.md Configuration
CLAUDE.md is a guide for Claude - this gets loaded into every query. Add:
- Your preferred writing style
- Project context
- Anything you want Claude to keep in mind
The starter includes a basic one, customize it for your needs.
Multiple CLAUDE.md files: I keep one at the root that explains how my folders are structured, then additional CLAUDE.md files in project folders with project-specific context. Claude always reads the root one, and loads the project-specific one when working in that folder.
Part 8: Customizing the Look
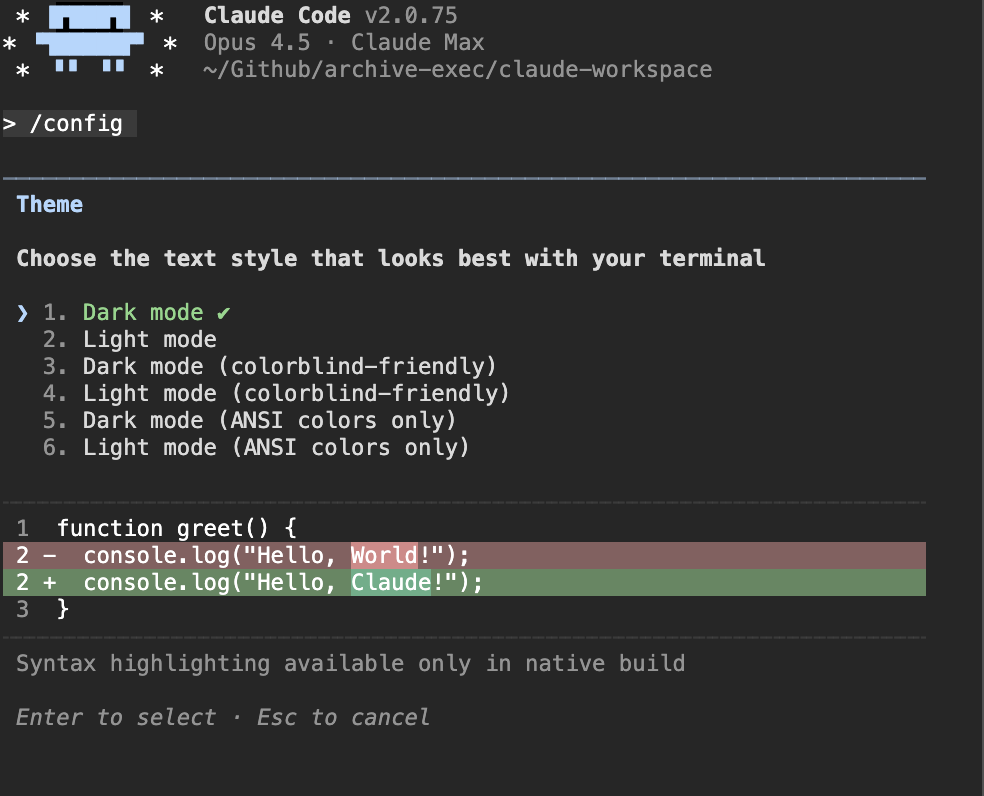
Claude Code Theme
Run /config in Claude Code, tab down to Theme, hit enter. Options include dark mode, light mode, and colorblind-friendly themes.
Obsidian Theme
Obsidian has hundreds of community themes:
- Settings → Appearance → Themes → Manage
- Browse themes and click to preview
- Click “Use” to apply
I use “Minimal” - the Claude Sidebar plugin inherits your Obsidian theme’s colors.
Checkpoint
Migration:
- Set up sync/backup
- Identified which tools to migrate
- Exported data from at least one tool
- Organized files in logical structure
Customization:
- Created or modified a custom command
- Updated CLAUDE.md with your preferences